Tuesday, April 9, 2013

Where the "Magic" Happens

I recently was asked to show my work space to The Etsy Wedding Team.

Below is my home office and work space. I'm fortunate enough to work out of my home and I'm very proud of the space I've set up. I truly belie that having an office you enjoy being in helps you be more productive. I worked for years in "Corporate-Land" and it's very refreshing to have a work space that I can decorate, paint and love to live in.


Tuesday, April 2, 2013

Making Labels - Mail Merge for Brides and Grooms

Making labels (or Mail Merge as it's called in Corporate-Land) is a handy life skill that everyone should learn. I used to work for a national corporation and only 3 of us could make labels. So I became the go-to person for the entire companies mail merge needs. After 5 years of making labels I feel confident I could do this in my sleep.

Making labels for your wedding invitations is a great way to save on a calligrapher and still have a formal/fancy look.Making labels is easy as long as you carefully follow a few steps.

You'll need : Microsoft Excel, Microsoft Word, Avery or Generic Labels (I prefer the clear ones)
(I believe this can be done in Microsoft Open Office as well)

Follow these steps to make wonderful labels for your envelopes.


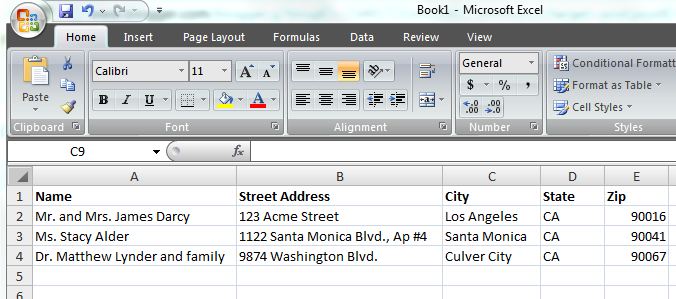
  • Make an excel sheet with your addresses. You'll need 5 columns.

    • Columns A: Names (Spell out the names and titles EXACTLY as you'd like them to be on the invitations
    • Columns B: Street Addresses. Here you will write the house/building number, street name and until/apartment number. Remember, a comma goes after the street name ONLY if there is a unit/apartment number
    • Columns C: City. Just spell out the city, no need to any commas or abbreviations. You'll need to spell out Los Angeles, not write "LA"
    • Columns D: State. You can either abbreviate these (CA for California) or spell them out. It all depends on how formal you'd like to be. For our example I'll 
    • Columns E: Zip Codes. Just write them as is. Note: New Jersey thought they'd be awesome by having "Zero" as the first number of the zip code. If you have any zip codes starting with Zero you'll notice Excel will make the zero disappear. You can make it stay by right-clicking on the column and select "Format Cells" and select "Zip Code". This will now allow the Zero to be the first number in the zip code
    • **IMPORTANT **Now in Row 1 give a title to each column: "Names" "Street Address" "City" "State" Zip" (See picture below) Save your spreadsheet and close Excel.

  • Gather the clear address labels you bought and notice what Avery # They have on them. For this example we'll use 18663


  • Open up Microsoft Word and being the Mail Merge Process
    • Click on "Mailings" then "Mail Merge" then "Labels"
    • The next screen will then ask for the label number. For our example I scrolled down an selected 18663
    • Once you hit "OK" you should now see a blank Word sheet with empty squares.
    • At the top click on "Select Recipients" then "Use Existing List" Browse for your saved list. 
    • Once you open the list the next window is only asking for which tab on the spreadsheet you'd like to use. For most people it will be "Sheet1$"
    • You'll see all the boxes,except for the first one, fill with «Next Record»
    • In the first box you will now design how the label will look.
    • Click on "Insert Merge Field" from the top and now insert the date in the order you'd like it to appear. Don't forget to put a comma between the city and state. (See sample below)
    • Now you'll need to format the 1st label. Select any fonts and paragraph spacing that you'd like. I chose to make the names a script font and the address a serif font. You don't want to get too fancy with the font for the addresses as the post office will need to be able to easily read the address. You don't want to risk all of your invitations returning to you because the post office found the addresses not legible. 
    • Once you have the formatting correct, you'll need to update all your labels. Click on "Update Labels" then click on "Preview Results". You should now see the first page of labels. If any changes need to be made to formatting. Edit the first label again ,then click on "Update Labels" then "Preview Results". 
    • Once you are happy with the labels click on 'Finish and Merge" then "Edit Individual Documents". Go through all your labels and make sure everything looks good and is formatted correctly.
    • SAVE YOUR FILE- you never know, it's always a good idea to save
    • Print onto your labels and enjoy! 

  • Now that you are a MailMerge Label-Making master you can add "Mail Merge" as a skill to your resume! 


Tuesday, March 26, 2013

RSVP Due Dates and Due Don'ts

 
One of the most common question brides ask me is what due date to put on their RSVP cards. 

Usually 1 month before your wedding date is plenty of time. There are a few things to consider:

1) When does your cater need a final head count
2) When does the location/planner need a final head count
3) While most people will promptly return their RSVP cards by the due date there are a few guests who will not get around/forget to return the card. You will need to plan on at least 1 week of tracking these guests down to get their RSVP from them via/phone/email/text.

Due Date Dont's
1) Don't make the RSVP Due date 2 months after you send out the wedding invitation. Your guests will put the RSVP aside and many will forget to sent it back.
2) Don't forget to include a stamp and write your address on the RSVP envelope.This not only is proper etiquette but it encourages your guests to return the RSVP cards.

DIY Tip: 
It's fun getting all your RSVP cards back in the mail. It's one of the few times in your life you'll enjoy checking the mail. Consider binding all your RSVP cards into a book form.

Wednesday, August 24, 2011

Here a font, there a font. Everywhere a script font. Choosing a font for the Non-Designer.

Choosing a font can sometimes be a daunting task when it comes to wedding invitations. You want a font to really mesh well with your dream design and you still want it to be legible. And most non-designers are unaware of “Font Politics.”

There are literally thousands upon thousands of fonts to choose from, it’s no wonder couples can get lost into a deep abyss of choices. If you’ve ever seen the documentary “Helvetica” you’re aware of “Font Politics”. Some people (Designers, Hipsters and Librarians) feel very strongly about certain fonts. Using the wrong font can almost be insulting to some designers, while others can see the same font as “adorable” or “fancy”. Recently I was reading Emily Post, the foremost leader of wedding etiquette, and she suggested for more casual invitations to use the font “Comic Sans”. As a designer, I almost had a heart attack after reading this. How does Emily Post not know of the secret (or not-so-secret) war against the font “Comic Sans”?!! Then it hit me, only designers know or even care about font choices. Comic Sans has long been the font that is over used and often misused. Designers all recognize fonts have personalities. Some are more causal, others are more formal.

When choosing a font for your wedding invitations you may want to consider if you want to play “Font Politics” and stay away from “controversial” fonts, like Comic Sans and Helvetica. However, if you really like a “controversial” font and you’re not marrying a graphic designer, go for it. It’s important to really love your wedding invitations.

For those non-designers here is a cheat sheet to help you choose a font.

To really simplify things there are 4 different kinds of fonts:

1) Serif Fonts:
A serif is the little bar as the end of the stroke of each letter. For example: If you are using “Times Roman” you’ll see a little bar and the bottom and tops of the letter “T”. These are the serifs. These fonts are more traditional and formal.

2) San Serif Fonts
These fonts are without serifs. So if you were using the font “Arial” you’ll see there is no little bar at the end of the letter “l”. These fonts are more modern looking and easier to read.

3) Script Fonts
These fonts look like cursive. The most common script for wedding invitations is “Edwardian Script”. One things to look out for is to make sure your script font is still legible. Some fonts are more traditional looking, while others are much more modern. I would say, if the font looks like something your grandmother would have had on her wedding invitations it’s more of a traditional script font. If the script font looks like it would only appear after 1960 it’s more of a modern font.

4) Novelty/Decorative Fonts
Well, Wingdings is a novelty font, but I doubt you’re considering for your wedding invitations. Other great novelty fonts to look at are ones that look like old typewriters or handwriting.

If you are making your own wedding invitations and are looking for some new fonts take a look at www.dafont.com
This website is full of great fonts. Some are free and other s you have to pay for.

(Some people make fonts for a living!)


Tips for combining fonts:

Just like how polka dots and stripes don’t go in fashion, certain fonts don’t go together. A good rule of thumb is not to combine a serif font with a modern script or a novelty font. San Serif fonts go well with more modern scripts and novelty fonts. Serif fonts go well with traditional script fonts. A way to tell if your script font is more modern or traditional, ask yourself, would this font be used 1950 or earlier? If the answer is “yes”, it’s likely a traditional font. Of course, rules were meant to be broken. Try different combinations and ask a few of your friends who have an “eye” for design for their opinions.


Remember, have fun with font just like you would with fashion!

Tuesday, August 9, 2011

Wedding Invitations Cost How Much!!!??

You’ve gotten engaged and you’re ready to plan your wedding. You know the dress, food and venue will be expensive, but there are many other little details that cost more than you think.

Wedding invitation pricing can vary greatly. If you are looking for traditional engraved or letter press invitations be ready to use a good chunk of your budget. Letter press invitations are very beautiful because they leave an embossment in the paper. These can run you up to $2.50-$3.00 each. The reason these invitations are so expensive it because of the intense labor that goes into printing these types of invitations. Everything is done by hand, from setting each letter to hand inking each print. There is nothing more luxurious than a traditionally printed invitation; however, like most beautiful things in life, they don’t come cheap.

Most couples today opt for invitations that are printed digitally because they are much more cost effecting. Invitations can run you anywhere from 60 cents each to $1.50 each. Most of the major wedding invitation websites offer digital printing. Most of these websites offer designs in a few colors and simply cut and paste your custom wording onto them.
These invitations are usually not printed on archival paper, so make sure to check the fine print.

A great site for very unique wedding invitations (besides my own website! www.cottontaildigitalpress.com) is Etsy.com
There are many great designers on there that will work directly with you to create any type of custom invitation design. These may cost you a little more than a major wedding invitation website, but you’ll get something very special and custom.

Now, maybe you’ve found the invitations of your dreams, but it’s still costly. Here are a few tricks to lower the cost:

1) Don’t opt for the inner and outer envelopes. Just get a simple envelope to encase everything. I know they look beautiful, but your guests will likely throw them away.

2) Do an RSVP post card. This will save you from purchasing matching envelopes.

3) Get a website through www.theknot.com or a similar website and have guests RSVP through there. Simply put a line at the bottom of your wedding invitation: Please RSVP on our website at: www.ourwedding2011.com

4) Forego the tissue inside the invitation. The tissue is necessary if you are getting traditionally printed wedding invitations (Letter press or traditional engraved ones) the tissue keeps the ink from your invitation from bleeding to the rest of the paper inside your envelope. If you are getting digitally printed invitations these are not necessary. Some people still use them simply out of tradition.

5) Print your own wedding invitations. There are many free templates online to print your own wedding invitations. (I only suggest this to people who are computer and printer savvy.) Check Out http://www.downloadandprint.com/invitation-templates/
You can also contact designers on Etsy and some will be willing to sell you a custom invitation in JPEG format that you can print at home.

6) Instead of hiring a calligrapher print out your addresses in a nice font on clear address labels. Keeping in mind to to use too crazy of a font, the post office still needs to read the address.

Remember wedding invitations set the tone for your wedding. What’s most important is that you find the right design that works best for your event and fits within your budget.

One last tip: Many couples forget you don’t need to order as many invitations as there are people invited to your wedding. You only need 1 invitation per household address.